Overview
Shrapnel, by Tech Audio, is a physics-driven audio instrument built around a 2D sandbox. Particles spawn and fall through the sandbox, collide with shapes you place inside it, and each collision can trigger sample playback, granular synthesis, MIDI notes, or live audio input — independently per collider.
You build the instrument by arranging colliders (circles, rectangles, triangles, right triangles) inside the sandbox. Particles spawn from a spawner that you aim like a slingshot, fall under gravity, and bounce off the colliders. Every collider can carry up to eight independent sound slots, so a single shape can layer a sample with a MIDI note and a granular voice all on the same hit. Per-sound randomization of pitch, volume, filter cutoffs, and more help add variation to each collision. Each slot can decide which particles trigger which sounds based on size, or color.
Particles are assigned colors from a configurable palette, and each color can route to different sounds. Shrapnel also includes per-collider voice limiting and one-voice-per-particle modes, an MSEG editor for drawing envelopes that shape parameters based on where the collisions happen, a Spawner Motion system of LFOs that animate the spawner in space, live audio input captured into particles at spawn time, output recording straight to disk, and a portable preset format.
Shrapnel runs as a standalone application or as a VST3, AU, AAX, or CLAP plugin on Windows and Mac.
- System Requirements
- Installation
- Activation
- Quick Start
- Tooltips
- Basic & Advanced Modes
- The Sandbox
- Colliders
- Sound Slots
- Particles & The Spawner
- Collision Filters
- Output Modes
- Per-Slot Audio Filters
- Sample Groups
- Particle Colors
- Voice Management
- MSEG Envelopes
- Spawner Motion
- Stats & Preferences
- Presets
- Recording
- Performance
- Glossary
System Requirements
- Windows or macOS
- A DAW that supports VST3, AU, AAX, or CLAP plugins (for plugin use), or launch Shrapnel as a standalone application
- A valid Shrapnel license for activation
Installation
- Download the Shrapnel installer from our product page.
- Quit your DAW before installing if you plan to use the plugin.
- Run the installer and follow the prompts for your operating system. The installer places the VST3, AU, AAX, and CLAP plugin files in the standard system locations and installs the Shrapnel standalone application.
- Reopen your DAW and rescan plugins if Shrapnel does not appear automatically.
- Insert Shrapnel on an audio, instrument, bus, or effects track — or launch the Shrapnel standalone app from your Start Menu (Windows) or Applications folder (macOS).
Activation
Your purchase includes a license key that activates Shrapnel on up to three computers. Activation is a one-time, online step per machine; once activated, a machine does not need to stay connected to the internet to keep working.
To activate:
- Open Shrapnel in your DAW or launch the standalone application.
- Open the Settings panel (the gear button) and, under License, click Manage License…. You can also click the DEMO MODE indicator in the bottom-left corner to jump straight to the same window.
- Paste the license key from your purchase confirmation into the field and click Activate. Make sure you are connected to the internet.
- The status changes to Activated and the DEMO MODE indicator disappears. Restart your DAW (or the standalone app) if Shrapnel asks you to reload.
If activation fails, confirm that the key was entered exactly as provided (it is easiest to copy and paste it) and that your system clock and internet connection are working normally. The License window shows a short message describing why an attempt was rejected.
Moving to another computer. Reinstalling Shrapnel on a machine that is already activated does not use up another activation, so a reinstall or OS update on the same computer is free. If you have run out of activations — for example after replacing or retiring a machine — email us at support@techaud.io with your license key and we will free up a slot for you.
Before activation — Demo Mode
Until a license is activated, Shrapnel runs in Demo Mode. Every feature is available except saving and loading state, and the audio drops out periodically. Activating removes both limitations.
Quick Start
First launch: The first time you open Shrapnel it loads a default preset with sounds already loaded, so spawning particles makes sound right away. For a blank slate with no sounds loaded, select the Init patch from the preset browser.
The fastest path from an empty patch to sound:
-
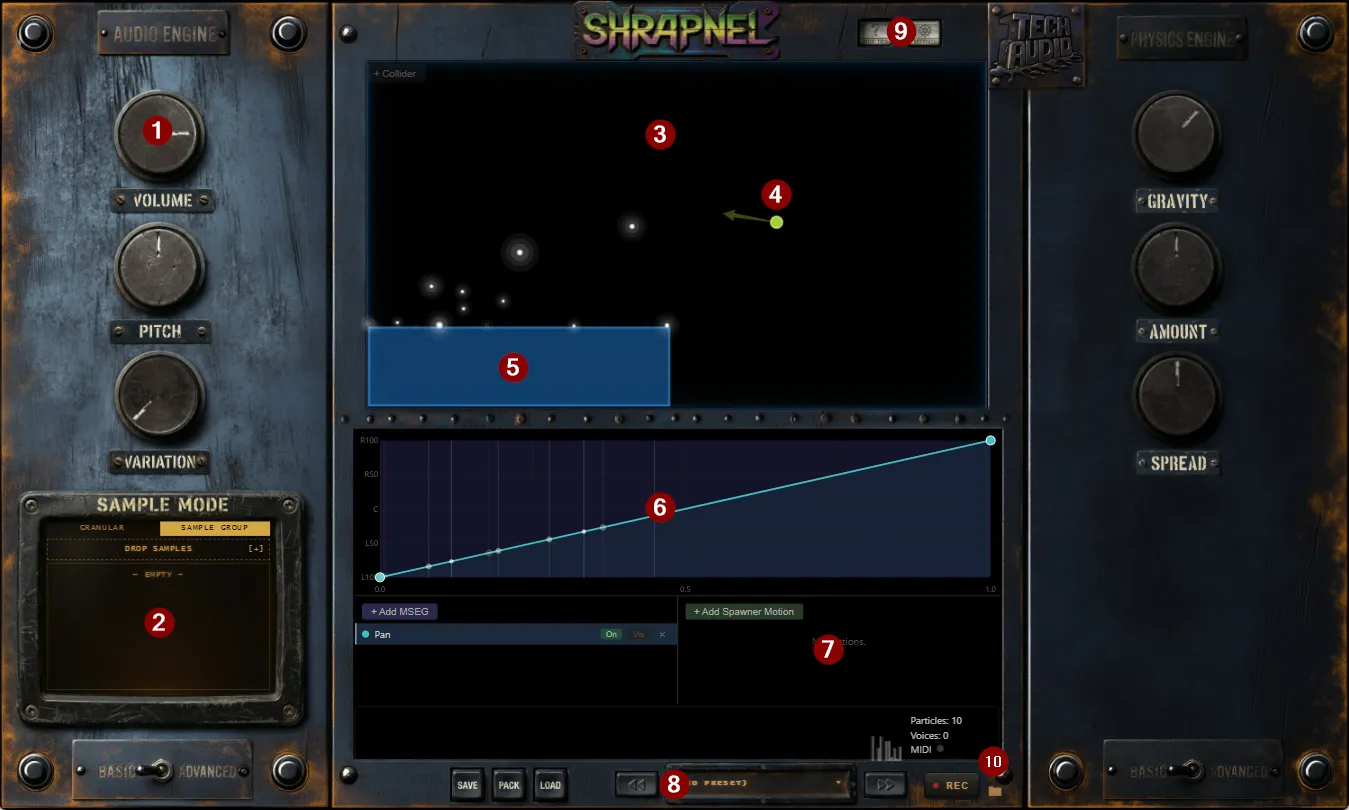
Load the Init preset for a clean starting point. The plugin opens in Basic mode: six big knobs (three on each side) and a CRT-style SAMPLE MODE display on the left, with the empty sandbox in the middle.
-
Drop in audio file(s). On the left panel, the SAMPLE MODE display has two tabs: GRANULAR and SAMPLE GROUP. SAMPLE GROUP lets you drop a pile of files and picks one at random per hit. GRANULAR loads a single file and triggers grains from the sample each hit. Select the mode you want to use and drag a
.wavfile where indicated. -
Right-click in the sandbox to place the spawner. A persistent dot appears wherever you right-click. Drag right-click to aim (it works like a slingshot — drag away from the direction you want to fire). Release to lock in the aim.
-
Hold Ctrl to spawn particles. By default the spawn key is Ctrl. Tap it for a single burst; hold it for a continuous stream. Particles fly out, fall, collide with the default collider, and the sound(s) loaded play.
-
Turn the knobs.

| Knob | What it does |
|---|---|
| VOLUME | Plugin output level |
| PITCH | Tunes every sound up or down |
| VARIATION | How different each hit sounds (random pitch + volume) |
| GRAVITY | How fast particles fall |
| AMOUNT | How many particles fly out |
| SPREAD | Random left/right velocity applied at spawn |
Tip: Double-click any knob, slider, or range handle to reset it to its default value.
Before going further, take a moment to explore Shrapnel’s tooltip system, covered in the next section. Tooltips describe every control in the app and serve as a quick reference in place of this guide.
Tooltips
Shrapnel has detailed tooltips on virtually every control, button, slider, and interactive element in the app. Hover over anything for about half a second and a tooltip will appear describing what it does and how to interact with it.
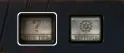
The tooltips toggle button is on the top strip of the metal casing (next to the settings button). When the button is pressed, tooltips are on; click again to turn them off. The setting persists across sessions.
Basic & Advanced Modes
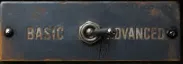
Each side of the plugin has its own panel that switches between Basic and Advanced mode. The toggle lives along the bottom of each side panel and the state persists per side independently.
Left Panel
- Basic — three Basic Mode knobs (Volume, Pitch, Variation) and the CRT-style GRANULAR / SAMPLE GROUP display. Samples loaded in basic mode will be triggered when particles hit the sandbox boundary (default collider).
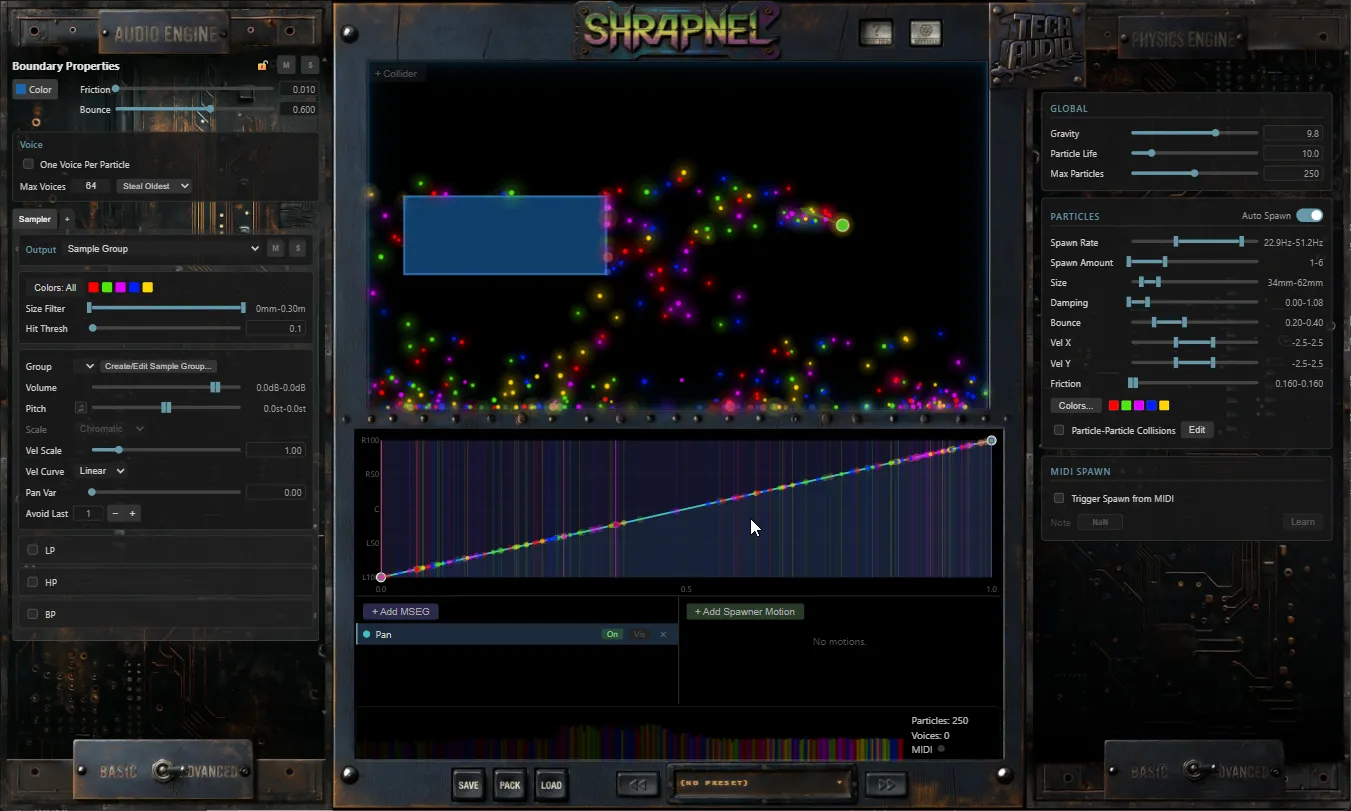
- Advanced — full Collider Properties panel: slot tabs, per-collider color/friction/restitution, voice management, and full editing for every sound slot in the selected collider.
Right Panel
- Basic — three Basic Mode knobs (Gravity, Amount, Spread). Edits the most-used spawner and physics parameters.
- Advanced — full Settings Panel: global physics, particle properties, spawner range sliders, and MIDI spawn trigger.
Basic mode is for quickly getting a sound in and hearing it in the sandbox without much hassle. The knobs allow for broad-stroke adjustments which for many users may be enough. For multiple sounds and full control over all aspects of the audio and physics engines, Advanced mode has you covered.
Tip: Basic knobs modify your Advanced settings rather than replace them. The advanced slider handles stay where you set them, but each slider’s readout reflects both the handles and any basic knob acting on it, so the numbers in advanced mode always show the true output. PITCH offsets every slot’s pitch in semitones; VARIATION adds random pitch and lowers the volume floor; AMOUNT scales spawn rate and per-spawn count; SPREAD scales damping and velocity spread. GRAVITY is the exception: it and the Advanced Gravity slider are the same control and always move together.
If a range’s readout won’t reach the min or max you’d expect from the handles, a basic knob is likely modifying it. Double-click that knob to reset it and remove the effect.
The Sandbox
The sandbox is a 2D physics world rendered in the center of the plugin. Particles spawn, fall, collide, and expire here. The four edges act as a default boundary collider. When no other colliders are selected, the default boundary collider’s properties will be displayed and editable in the left panel.
Spawner Interaction
| Action | How |
|---|---|
| Place spawner | Right-click in an empty area of the sandbox |
| Re-aim | Right-click and drag (slingshot — drag away from the target direction) |
| Fire particles | Tap or hold the spawn key (default Ctrl) |
| Auto-Spawn | Toggle in the right panel; particles fire continuously without the spawn key |
The arrow attached to the spawner shows fire direction and power. Spawner position and aim persist across editor close/reopen and DAW save/load.
Colliders
A collider is a static shape in the sandbox that particles bounce off (or pass through, if set as a trigger zone). Colliders carry sound — one or more sound slots each — and have their own physical material properties.
The Default Boundary Collider
The four edges of the sandbox are always a single, always-present boundary collider. It can’t be deleted, and its color frames the sandbox so you can see it at a glance. It’s the collider you’re editing when no collider is selected.
Shapes
Four user-placeable shapes are available: Circle, Rectangle, Triangle, Right Triangle. Circles have a single radius; rectangles, triangles, and right triangles have width and height handles.
Per-Collider Properties
These live above the sound-slot tabs in the Collider Properties panel:
| Property | Effect |
|---|---|
| Color | Cosmetic — sets how this collider looks in the sandbox |
| Friction | Surface friction at impact. Higher slows particles rolling along the collider |
| Bounce (Restitution) | How elastic the collision is. 1 = perfectly elastic; 0 = sticks |
Trigger Zones
Each collider has a Trigger toggle that converts it into a zone where particles pass through and fire its sound slots on entry. The Trigger Damping slider applies linear damping while particles are inside the zone (0 = pass straight through, higher = slow them down). The trigger zone option is not available on the default boundary collider.
Header Actions
The collider header (above the per-collider properties) hosts these buttons:

| Button | Effect |
|---|---|
| Lock Panel | Lock the properties panel to this collider — switching selection in the sandbox no longer changes what’s shown |
| Mute | Mutes every sound slot on this collider. Ctrl-click clears all mutes across the project |
| Solo | Soloes this collider — only soloed colliders produce sound. Ctrl-click clears all solos |
| Duplicate | Make an independent copy with the same shape and sound settings |
| Clone | Clone into a linked group — edits to one clone propagate to the others |
| Link | Link the currently multi-selected colliders into a single clone group |
| Unlink | Unlink this collider from its clone group (its sound settings stay) |
Duplicate, Clone, Link, and Unlink are only available on user-placed shape colliders, not on the default boundary collider. Mute, Solo, and Lock Panel work everywhere.
Deleting
With a collider selected, press Delete or Backspace to remove it. The default boundary collider can’t be deleted.
Adding a Collider
In the top-left of the sandbox, an overlay button reads + Collider. Click it for a dropdown of shapes: Circle, Rectangle, Triangle, Right Triangle. Pick a shape, then click anywhere in the sandbox to place it. Press Escape to cancel placement.
Selecting
| Action | How |
|---|---|
| Select a collider | Click its body |
| Add or remove from a multi-selection | Shift+click |
| Deselect | Click an empty area of the sandbox. With nothing selected, the left panel shows the boundary collider’s properties |
| Move | Drag the body |
| Resize | Drag an edge or corner handle |
| Rotate | Drag the rotation handle above the top edge |
Shift while resizing a corner scales uniformly from center. Multi-selected colliders move and resize as a rigid group.

Sound Slots
Every collider carries up to eight independent sound slots. All slots that pass their filters fire on the same collision, so a single collider can layer multiple outputs simultaneously, or play different sounds based on color and size of the particles.
Slot Tabs
A row of tabs appears between the per-collider properties and the per-slot controls. Each tab summarizes its slot’s output (e.g. “MIDI 3”, “Rock Impacts”, “Granular”, “Audio In”). The + button adds a new slot (max 8); the − button removes the active one (hidden when only one slot remains).
Copy & Paste Slots
Right-click a slot tab for a Copy / Paste menu. Copy captures that slot’s entire configuration — output mode, all controls, filters, and mute/solo state. Paste (right-click the destination tab) replaces it wholesale with the copied slot.
Output Mode
A dropdown menu at the top of the slot’s section selects where the slot routes hits:
- MIDI — send MIDI notes to the host
- Sample Group — pick a random sample from a named group
- Granular — play grains sliced from a loaded audio file
- Audio Input — play back the live audio coming into the plugin
Each output mode unlocks a different set of controls below it.
Per-Slot Actions
Each slot also has its own mute/solo (separate from the per-collider mute/solo above the tabs), so you can audition a single slot without changing the collider’s overall mute state. Ctrl-click either button clears all mutes/solos project-wide.
Particles & The Spawner
Particles are what drive everything in Shrapnel. Every sound emitted is triggered by a particle hitting something. They can fire one at a time or in dense streams, and each one can carry its own size and color. Once in the air they obey the full physics engine: gravity, velocity, damping, friction, and restitution all shape how they behave. After their lifetime they expire and clear out of the world.
Spawn Trigger
By default, the spawn key is Ctrl. Tap = single burst; hold = continuous stream at the spawn rate. The spawn key is rebindable in Preferences.
Global Particle Settings
In the Global section (right panel):
| Parameter | Effect |
|---|---|
| Gravity | Downward acceleration applied to every particle. Negative values make particles float upwards |
| Particle Life | Seconds until a particle is removed from the world |
| Max Particles | Cap on simultaneous live particles. New spawns are dropped once reached |
Auto-Spawn
A toggle near the top of the Particles section makes the spawner fire continuously without needing the spawn key held. Useful for performance and texture beds; turn it off for tighter control.
Spawn Parameters (right panel → Advanced → Particles)
All particle and spawn parameters use range sliders: drag the min/max handles to set a random range. Each particle picks a random value within the range.
| Parameter | What it controls |
|---|---|
| Spawn Rate | Particles per second when holding the spawn key |
| Spawn Amount | Particles emitted per spawn event |
| Size | Particle size in meters / millimeters |
| Damping | Linear damping (slows particles in flight) |
| Bounce | Bounce energy preserved per collision |
| Vel X / Vel Y | Initial velocity components in m/s |
| Friction | Surface friction during collisions |
Particle-to-Particle Collisions
A toggle in the Particles section. When on, particles collide with each other and can trigger sounds on contact. Off lets them pass through each other freely. The Edit button next to the toggle brings up the P2P collider properties in the left panel so you can assign and configure its sounds like any other collider (up to eight slots, same output modes and filters). The default Hit Threshold on the P2P collider is 5.0 m/s. Lower it to let more inter-particle contacts trigger.
MIDI Spawn
A separate section at the bottom of the right panel lets a MIDI note from your DAW trigger a single spawn event. Click Learn, play a note, and that note becomes the spawn trigger.
Collision Filters
Every sound slot can ignore collisions that don’t match its filters. Filters narrow which particles trigger which sounds and live just below the output dropdown.
Color Filter
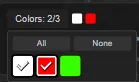
Particles spawn with one of the colors from the Particle Colors palette (see Particle Colors). The color filter button opens a popup showing every color currently in the palette; toggle which colors are allowed to trigger this slot. All enables every color; None allows none.
Color filters give you precise control over the probability distribution across sounds. For example, in the Particle Colors window weight the palette 70% blue and 30% yellow, then use color filters to set one slot to accept only yellow and another only blue — your two sounds will fire in a 70/30 ratio over time.
Size Filter
A range slider defining the particle size range that can trigger this slot. Particles outside the range are ignored. Combine with the Size range slider in the Particles section to set up size-selective triggering (small particles play one slot, large particles play another).
Hit Threshold
Minimum collision speed (in m/s) needed to fire the slot. Quiet brushes against the collider get filtered out. Useful for keeping high-velocity hits but skipping low-energy bounces.
Output Modes
Each sound slot on a collider routes through one of four output modes, selected from the dropdown at the top of the slot. Each mode unlocks its own set of controls.
Sample Group
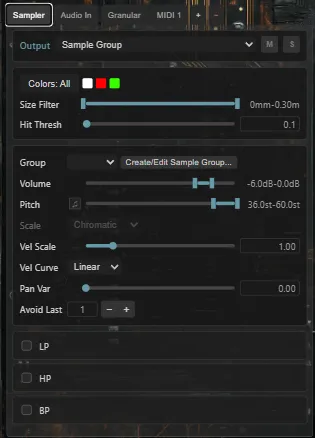
When a slot routes to a Sample Group, each collision picks a random sample from the group and triggers a voice. Sample groups are managed in the Sample Groups window (see Sample Groups).
Controls
| Parameter | Effect |
|---|---|
| Group | Which sample group this slot triggers |
| Volume | [Range] Per-trigger volume in dB (random range) |
| Pitch | [Range] Pitch offset in semitones (random range) |
| Pitch Snap | Snap the Pitch range to whole semitones |
| Pitch Scale | Restrict random pitch to a musical scale (snap on) |
| Vel Scale | Dynamic range between soft and hard hits |
| Vel Curve | Linear / Square Root / Squared response shape |
| Pan Var | Random stereo pan variation per trigger (0 = center, 1 = full random) |
| Avoid Last N | Skip the last N samples so the same file doesn’t play back-to-back |
In Basic mode, the PITCH knob offsets playback in semitones and VARIATION adds extra random pitch plus a lower volume floor, applied on top of these per-slot settings at trigger time. The slider handles stay exactly where you set them, but the Pitch / Volume readouts reflect the combined result of the handles and the knob, so they always show the true output. Double-click a basic knob to reset it to default if you want to remove its effect.
Sample Group slots also expose LP / HP / BP filters — see Per-Slot Audio Filters.
Granular
When a slot routes to the granular engine, each collision triggers a grain from a single source audio file.
Loading a Source
A waveform area at the top of the slot shows the loaded source. Drop a .wav file onto it or press the Browse… button to load. Multiple granular slots load independent sources.
Modes
Two modes via the toggle below the waveform:
- Selection — each grain starts randomly within an adjustable highlighted Position range on the waveform.
- Transient — Shrapnel detects transients in the source (peaks crossing a configurable threshold); each grain starts on one of the detected transients. The yellow dotted line on the waveform is the trigger threshold; the green dotted line is the reset level (the waveform must fall below it before another transient is registered). Drag the lines to tune detection. Red vertical lines show where the currently detected transients are.

Controls
| Parameter | Effect |
|---|---|
| Volume | [Range] Per-grain output volume in dB (random range) |
| Pitch | [Range] Per-grain pitch offset in semitones (random range) |
| Pitch Snap | Snap pitch range to whole semitones |
| Pitch Scale | Restrict to a musical scale (snap on) |
| Position | [Range] (Selection mode) Playback region inside the source |
| Offset | [Range] (Transient mode) Offset around each transient marker |
| Pitch Scales Envelope | On: pitch scales the AHD envelope — higher pitch finishes faster, lower pitch stretches it. Off: envelope runs in real time regardless of pitch |
| Attack | [Range] Fade-in time of each grain |
| Hold | [Range] Time at full level between attack and decay |
| Decay | [Range] Fade-out time of each grain |
| Vel Scale | Dynamic range between soft and hard hits |
| Vel Curve | Linear / Square Root / Squared response shape |
| Pan Var | Random stereo pan variation per grain |
Granular slots also expose LP / HP / BP filters — see Per-Slot Audio Filters.
MIDI
When a slot’s output is set to MIDI, collisions are sent as MIDI note-on / note-off events to the host (or a connected MIDI device in standalone) on the channel chosen in the slot’s MIDI controls.
Controls
| Parameter | Effect |
|---|---|
| Channel | MIDI output channel (1 – 16) |
| Monophonic | A new note steals the previous note instead of stacking |
| Gate | How long the note stays on (seconds) before a note-off is scheduled |
| Vel Scale | Dynamic range between soft and hard hits. Low = flat; high = wide |
| Vel Curve | Linear, square root, or squared — shape of speed → velocity mapping |
| Note Range | Lowest and highest MIDI notes that can be picked (random per hit) |
| Scale | Musical scale to constrain the random note pick |
| Avoid Last N | Skip the last N notes when picking so the same pitch doesn’t repeat |
Note Selection
Each collision picks a random note inside the Note Range. If a Scale is selected, only notes belonging to that scale are eligible.
Velocity
Collision speed maps to MIDI velocity via the Vel Scale and Vel Curve combination:
- Vel Scale sets the dynamic range — low values flatten everything to a similar velocity, high values widen the response between soft and hard hits.
- Vel Curve shapes the response: Linear is direct; Square Root lifts soft hits upward so dynamics feel even; Squared pushes soft hits downward for more dramatic dynamics.
Audio Input
Audio Input mode plays back the live audio coming into the plugin. Each collision starts a voice that begins reading the input stream a moment in the past — up to ~2 s of pre-buffered audio — and follows it forward as new audio arrives.
Controls
| Parameter | Effect |
|---|---|
| Volume | [Range] Per-trigger output volume in dB |
| Pitch | [Range] Per-trigger pitch offset in semitones |
| Pitch Snap / Scale | Snap to semitones / scale (snap on) |
| Pos Rand | Random backward shift (in seconds) of the playback start position into the pre-buffered audio, so simultaneous hits don’t play identical material |
| Attack / Hold / Decay | [Range] AHD envelope per playback |
| Vel Scale / Vel Curve | Dynamic range + curve shape |
| Pan Var | Random stereo pan variation per trigger |
Audio Input slots also expose LP / HP / BP filters (see Per-Slot Audio Filters).
Per-Slot Audio Filters
Sampler, Granular, and Audio Input slots each carry three independent filter stages:
- LP — low-pass
- HP — high-pass
- BP — band-pass
Each filter has an enable toggle, a Mode pill, and Frequency and Q range sliders.
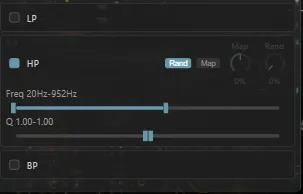
Filter Modes
- Rand mode (default) — each trigger picks a random cutoff frequency within the Freq range.
- Map mode — collision velocity maps to a point within the Freq range, with optional random jitter on top. The Map knob controls direction and depth (-100% inverts the mapping; +100% maps high velocity to the high end). The Rand knob adds random jitter on top of the mapped frequency.
The Q range slider behaves the same way as Freq — random per trigger in Rand mode, with velocity mapping in Map mode.
Sample Groups
The Sample Groups window (opened via the Create/Edit Sample Group… button when Sample Group is the selected output) manages named pools of audio files. Each group can be assigned to one or more sampler slots; Sample Group output on a collider uses the selected sample group to randomly select a file to play on collisions.
Window Layout
- Left list — every sample group. Double-click to rename, click to select. Each group’s row has a delete (×) button on the right.
- Right list — the samples in the selected group.
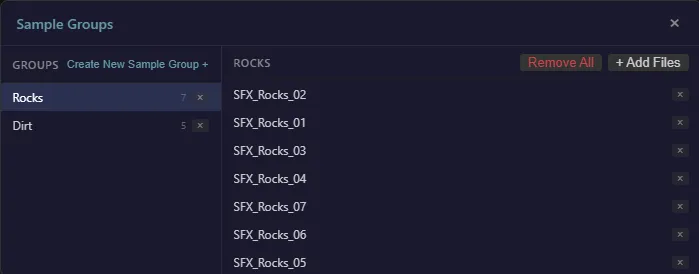
Actions
| Action | How |
|---|---|
| Create a group | Click the Create New Sample Group + button in the groups list header |
| Rename a group | Double-click the group’s row |
| Delete a group | Click its × button (deletes the group and all its samples) |
| Add samples | Click Add Files or drag .wav files onto the right list |
| Remove a sample | Click the (×) on its row |
| Clear a group | Click Remove All to remove every sample from the group (group itself stays) |
Tip: A sample group’s samples are referenced by file path in regular saves. Pack the preset (see Presets) to bundle the audio inside the preset file.
Particle Colors
The Particle Colors window (opened via the Colors… button in the Particles section) manages the particle color palette. Every particle that spawns picks a color from this palette according to per-color weights.
Per-Color Controls
| Control | Effect |
|---|---|
| Color Swatch | Click to open the color picker for this entry |
| Weight | Relative probability of being picked at spawn. Higher = more often |
| Remove (×) | Remove this color from the palette |
Click + Add Color at the bottom of the window to add a new color to the palette.

Routing Particles by Color
Particle colors aren’t just cosmetic. Combined with the Color Filter on each sound slot (see Collision Filters), they let you route different colors to different sounds. A common pattern: Add multiple sound slots to a collider that allow only a single color each — then weight the palette so the colors mix in the proportions you want.
Voice Management
Each collider has its own voice management section (above the slot tabs). These settings control how the collider behaves when many simultaneous voices are in flight.
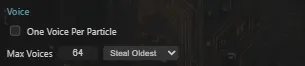
One Voice Per Particle (OVPP)
When checked, each particle plays only one voice on this collider at a time (or one stack of voices if the collider has multiple sound slots). A repeat hit from the same particle replaces the previous voice(s) instead of stacking. Tracked per collider — other colliders aren’t affected.
Fade Time controls how a voice fades out when its particle expires (avoids clicks).
Voice Limit
Cap on simultaneous voices this collider may produce across its sound slots. When the cap is hit, the Steal mode chooses which voice to release:
- Oldest — release the voice that has been playing longest.
- Newest — release the most recently started voice.
- Slowest — release the voice whose collision speed was lowest.
Global voice cap is also configurable in Preferences (see Stats & Preferences).
MSEG Envelopes
The MSEG editor (below the sandbox) draws breakpoint curves that you can route to sound parameters or output as MIDI CCs.
How MSEG Curves Work
The curve’s X axis is the horizontal position of the collision in the sandbox (0 = left wall, 1 = right wall). Whenever a collision happens, the curve is sampled at the collision’s X position and the resulting Y value is sent to the envelope’s target. The MSEG parameters work globally on all colliders, they are not collider specific. By default there is a Pan MSEG that pans all sounds based on where they occur in the sandbox.
Editing the Curve
| Action | Effect |
|---|---|
| Click empty area | Add a new breakpoint |
| Drag a point | Move it (X stays between neighbors) |
| Right-click a point | Delete it |
| Shift+drag a segment | Bend the curvature |
| Right-click a segment | Reset to linear |

Envelopes List
Underneath the curve area on the left, the Envelopes List holds named envelopes. Click + Add MSEG to pick a destination — either a plugin parameter or a MIDI CC. CC envelopes expose CC Number and Channel fields (Channel = All broadcasts on every channel).
| Row Control | Effect |
|---|---|
| Click row | Edit this envelope in the curve area above |
| Enable | Bypass when off |
| Visible | Show as a dimmed overlay in the curve area when another envelope is being edited |
| × | Delete this envelope |
Spawner Motion
The Spawner Motion panel (below the MSEG editor on the right) lets you attach LFOs to the spawner. Each motion drives one of three spawner targets — Translation (position), Rotation (aim), or Strength (fire power) — with a chosen shape, frequency, and depth.
Creating a Motion
Click the + Add Spawner Motion button in the panel header and pick a target (Translation / Rotation / Strength) from the menu. A new motion row appears, with the target shown as a label at the start of the row. The target is locked once chosen — to change a motion’s target, delete it and add a new one.
Shared Controls
These appear on every motion row regardless of target:
| Control | Effect |
|---|---|
| Enable | Toggle the motion on or off without removing it |
| Freq | LFO frequency in Hz |
| × | Delete this motion |
The remaining controls depend on the target.
Translation (Trans)
LFO modulates the spawner’s position in the sandbox.
| Control | Effect |
|---|---|
| Shape | Click to cycle — Sine (smooth LFO) or Noise (smoothed random) |
| Axis | X or Y — which dimension of the position the LFO sweeps |
| Amp | LFO depth as a percent |
| Phase / Smooth | Third knob — Phase ° in Sine mode (starting phase offset); Smooth % in Noise mode (low-pass smoothing of the random output) |

Rotation (Rot)
LFO modulates the spawner’s aim angle.
| Control | Effect |
|---|---|
| Shape | Click to cycle — Sine (smooth LFO), Noise (smoothed random), or Const (free-running spin) |
| Axis | Hidden in Sine and Noise modes. CW / CCW (Clockwise / Counter-Clockwise) in Const mode to pick the spin direction |
| Deg | LFO depth in degrees. Disabled in Const mode (free-running spin uses Freq only) |
| Offset / Smooth | Third knob — Offset ° in Sine mode (center-angle offset, ±180°); Smooth % in Noise mode; disabled in Const mode |
Strength (Str)
LFO modulates the spawner’s fire power.
| Control | Effect |
|---|---|
| Shape | Click to cycle — Sine (smooth LFO) or Noise (smoothed random) |
| Amp | LFO depth as a percent |
| Phase / Smooth | Third knob — Phase ° in Sine mode; Smooth % in Noise mode |
Multiple motions stack — e.g. one LFO for X position, another for Y position, a third for rotation.
Stats & Preferences
Stats Panel
Toggle the Stats Panel in Preferences to show a strip below the sandbox with:
| Readout | What it shows |
|---|---|
| Activity Graph | Scrolling history of recent collisions — each bar’s height is the collision velocity and its color is the colliding particle’s color |
| Particles | Number of live particles in the world |
| Voices | Combined live sampler + granular + audio-input voices |
| MIDI | Lights up when MIDI is being emitted to the host |

Preferences Window
Open via the gear button on the top metal strip.
Window
- Window Size — sets the default editor size, chosen from a dropdown of presets: Compact (900 × 540), Small (1050 × 630), Medium (1200 × 720), and Default (1350 × 810). Save as Default to persist changes. On AU and AAX, a change takes effect the next time the window is reopened.
Visuals
- Stats Panel — show the panel described above.
- MSEG Collision Flash — animated dots on the MSEG curve when collisions evaluate it.
- Particle Glow — ambient glow, sparkle, and collision-flash effects on particles. Disable for lower GPU load.
Audio
- Max Voices — global cap on simultaneous sampler / granular / audio-input voices across all colliders.
- Voice Steal Fade — fade-out time when an older voice is stolen because the global cap was hit (0 = hard cut).
- Audio Input Pre-Buffer — milliseconds of past audio buffered ahead of every audio-input voice. Acts as runway for pitch-shifted-up playback (which reads faster than incoming audio arrives) so the voice doesn’t immediately run out of material. Default 500 ms; range 50–2000 ms.
Input
- Spawn Key — keyboard key that triggers particle spawning. Click Learn and press the key you want. Tap = burst; hold = continuous.
Save / Restore
- Save as Default — persist current preferences so new plugin instances start with these settings.
- Restore Factory Defaults — reset preferences (and the saved defaults file) to factory values.
License
- Shows whether this copy is activated, and a Manage License… button that opens the License window (see Activation) to enter a key and activate. There is no self-serve deactivation; to move a license to another machine, contact support@techaud.io.
Presets
The preset bar is located on the bottom of the center panel. Five buttons (Save / Pack / Load / ◀ Prev / Next ▶) and an LCD-style display.

| Button | What it does |
|---|---|
| Save | Save state to a .shrapnel file. Audio files referenced by path |
| Pack | Save state with audio embedded — portable across machines |
| Load | Open a .shrapnel file (auto-detects packed vs. plain) |
| ◀ / ▶ | Step through presets alphabetically in the current preset folder |
| Display | Click the ▾ carrot to open the preset browser dropdown |
Browse Dropdown
The carrot opens a menu of every preset in the presets folder. Subfolders appear as cascading submenus (Shrapnel reads two levels deep). Folders are listed first inside any folder, then files.
Default Preset Locations
| Platform | Path |
|---|---|
| Windows | %USERPROFILE%\Documents\Shrapnel\Presets |
| Mac | ~/Documents/Shrapnel/Presets |
Tip: Use Pack when sharing presets with others or to ensure audio files remain linked to the preset. A plain Save references audio by absolute path, which won’t resolve if files are missing.
Recording
Shrapnel can record its own output directly to disk as a WAV file. This is especially handy in the standalone application, where you can capture a performance without routing Shrapnel into a DAW — but it works in the plugin formats too.
The record controls sit in the bottom strip of the metal casing, just to the right of the preset bar: a REC button and a folder icon.
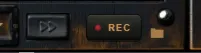
Recording a Take
- Click REC to start. The LED lights red and the button shows the elapsed time while recording.
- Play — spawn particles, trigger sounds, turn knobs.
- Click REC again to stop. The file is finalized and written to the recordings folder.
Shrapnel records the master output — everything you hear, after the Volume knob — as a 24-bit stereo WAV at the current session sample rate (whatever your audio device or DAW project is running at). Each take is written to its own timestamped file named Shrapnel_<preset>_<date>_<time>.wav, so recordings never overwrite one another.
Choosing the Folder
Click the folder icon to choose where recordings are saved. Right-click it to open the current folder in your system file browser. The chosen folder is remembered globally — it is shared by every Shrapnel instance and standalone launch on the machine.
Default Recording Locations
| Platform | Path |
|---|---|
| Windows | %LOCALAPPDATA%\Shrapnel\Recordings |
| Mac | ~/Library/Application Support/Shrapnel/Recordings |
Note: Recording is a licensed feature. In Demo Mode the REC and folder controls are shown but darkened and disabled — activate Shrapnel to enable recording.
Performance
If You’re Running Hot
- Lower Max Voices in Preferences if many slots are layering at once.
- Cap Max Particles in the Global section if you’re running thick spawn rates with long lifetimes.
- Disable Particle Glow in Preferences for lower GPU load.
- Disable Particle-to-Particle Collisions if you don’t need them — P2P contacts are far more frequent than collider hits.
- Tighten voice limits per collider — global cap can mask the fact that one collider is hogging all the voices. Use the per-collider Voice Limit to give each collider its share.
- Use OVPP on colliders where multiple bounces from the same particle don’t need to layer — replaces voices instead of stacking.
- Shorter sample / granular envelopes so voices finish before stealing kicks in.
- Avoid wide LP/HP/BP enable combinations if filter CPU adds up — disable filters on slots that don’t need them.
Diagnostics
The Stats Panel (enabled in Preferences) shows live counts for particles, voices, and MIDI activity. Watch the voice counter while playing to find your real ceiling.
Glossary
| Term | Definition |
|---|---|
| Sandbox | The 2D physics world where particles fall and collide |
| Collider | A static shape (circle, rectangle, triangle, right triangle) inside the sandbox |
| Particle | A dynamic circle spawned by the spawner; falls under gravity and triggers sounds on collision |
| Spawner | The persistent dot that fires particles. Placed by right-click, aimed by right-drag |
| Sound Slot | One of up to eight independent sound configurations per collider |
| Output Mode | Per-slot setting: MIDI, Sample Group, Granular, or Audio Input |
| Hit Threshold | Minimum collision speed (m/s) to trigger a sound slot |
| Color Filter | Per-slot setting allowing only specific particle colors to trigger the slot |
| Size Filter | Per-slot setting allowing only specific particle radii to trigger the slot |
| Sample Group | Named pool of audio files; a sampler slot picks one at random per hit |
| Granular Source | Single audio file loaded into a granular slot, sliced into grains per hit |
| Audio Input | Output mode that plays back the live audio coming into the plugin, with a short pre-buffer head start |
| Trigger Zone | Collider with bouncing disabled; particles pass through and fire its sound slots on entry |
| OVPP | One Voice Per Particle — each particle can only have one voice (or one stack) playing on a given collider |
| Voice Limit | Per-collider cap on simultaneous voices; Steal Mode chooses which to release on overflow |
| Boundary Collider | The always-present collider formed by the four sandbox edges; edited when no other collider is selected |
| P2P Collider | The single collider whose sound settings apply when two particles collide (enabled via the Particle-to-Particle toggle) |
| MSEG | Multi-Segment Envelope Generator — breakpoint curve sampled by collision X position |
| Spawner Motion | An LFO attached to the spawner that drives position, aim, or fire power |
| Pack | Preset save mode that embeds audio files inside the .shrapnel file for portability |
| Recording | Capturing Shrapnel’s master output to a 24-bit stereo WAV on disk via the REC button (licensed feature) |